/* |
平时工作代码进行重构时也会涉及到设计模式,另外在看一些开源框架时也会涉及到很多的设计模式。只是平时没有太全面的了解,最近面试时有同事问汲到这里,所以在这里整理以备将来随时查看。
这里我举一个最容易理解的例子来解释每种设计模式
首先看一下设计模式的分类及关系
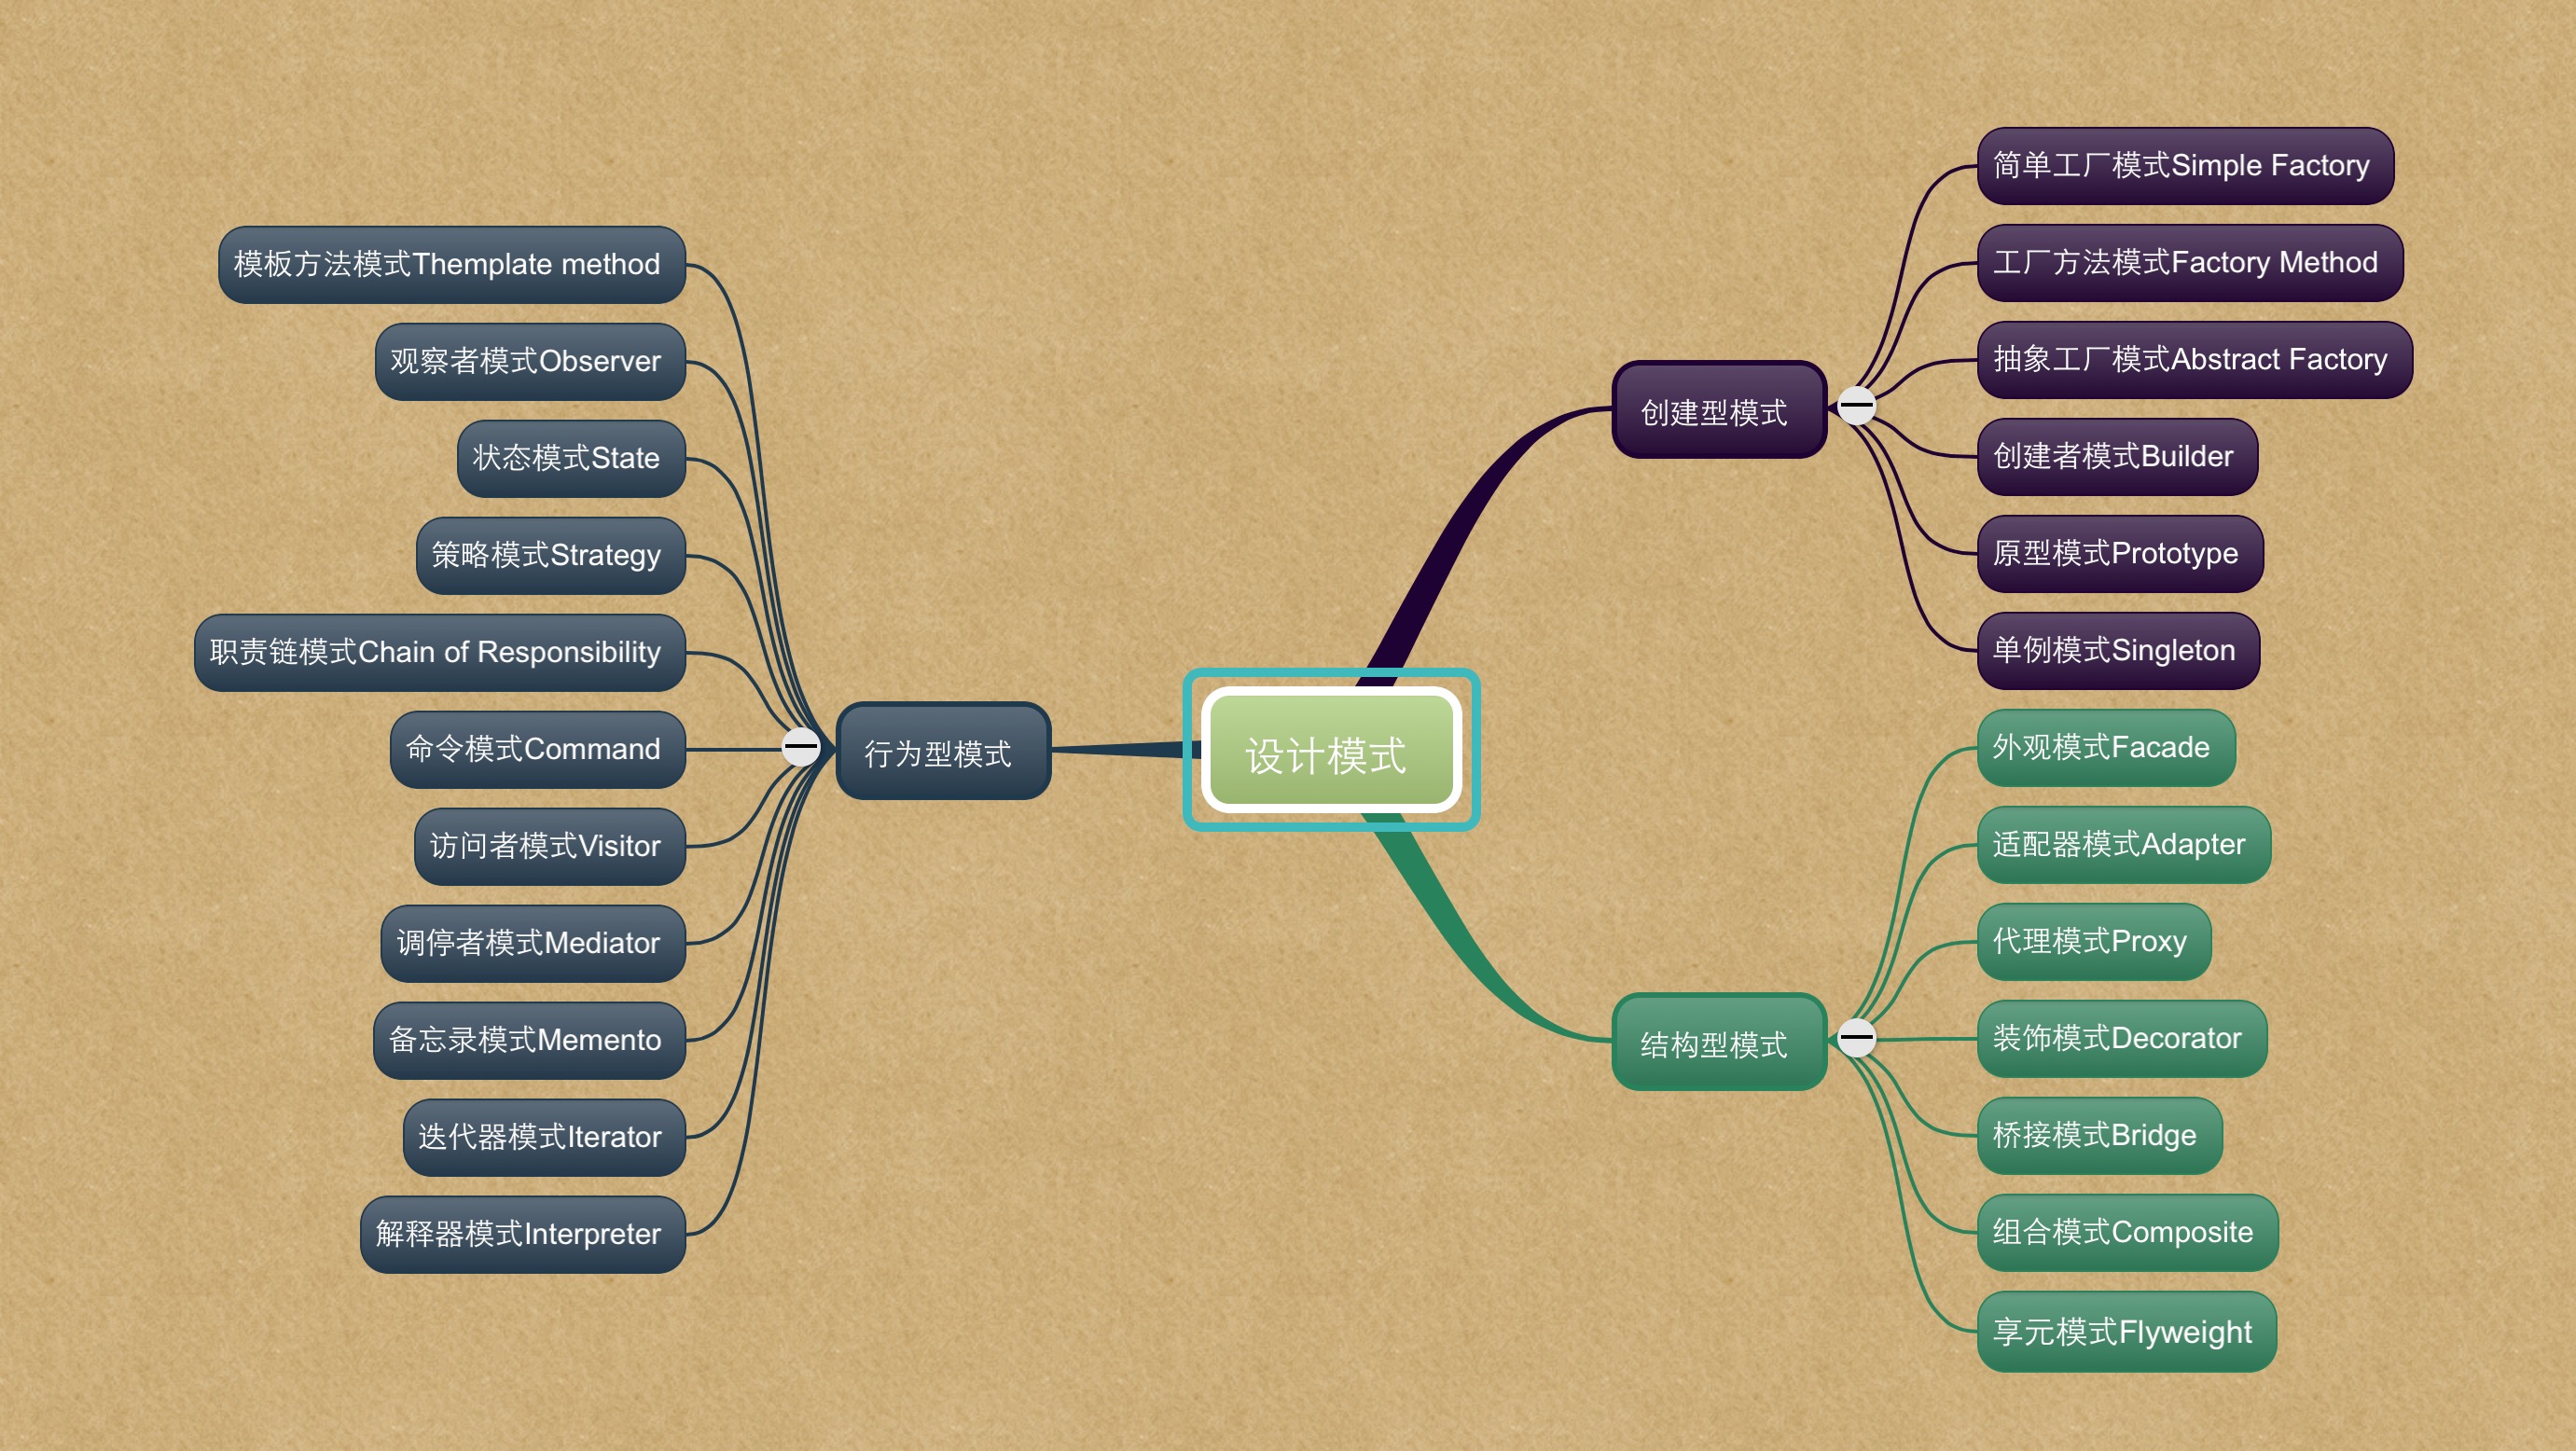
它们之间的关系如图: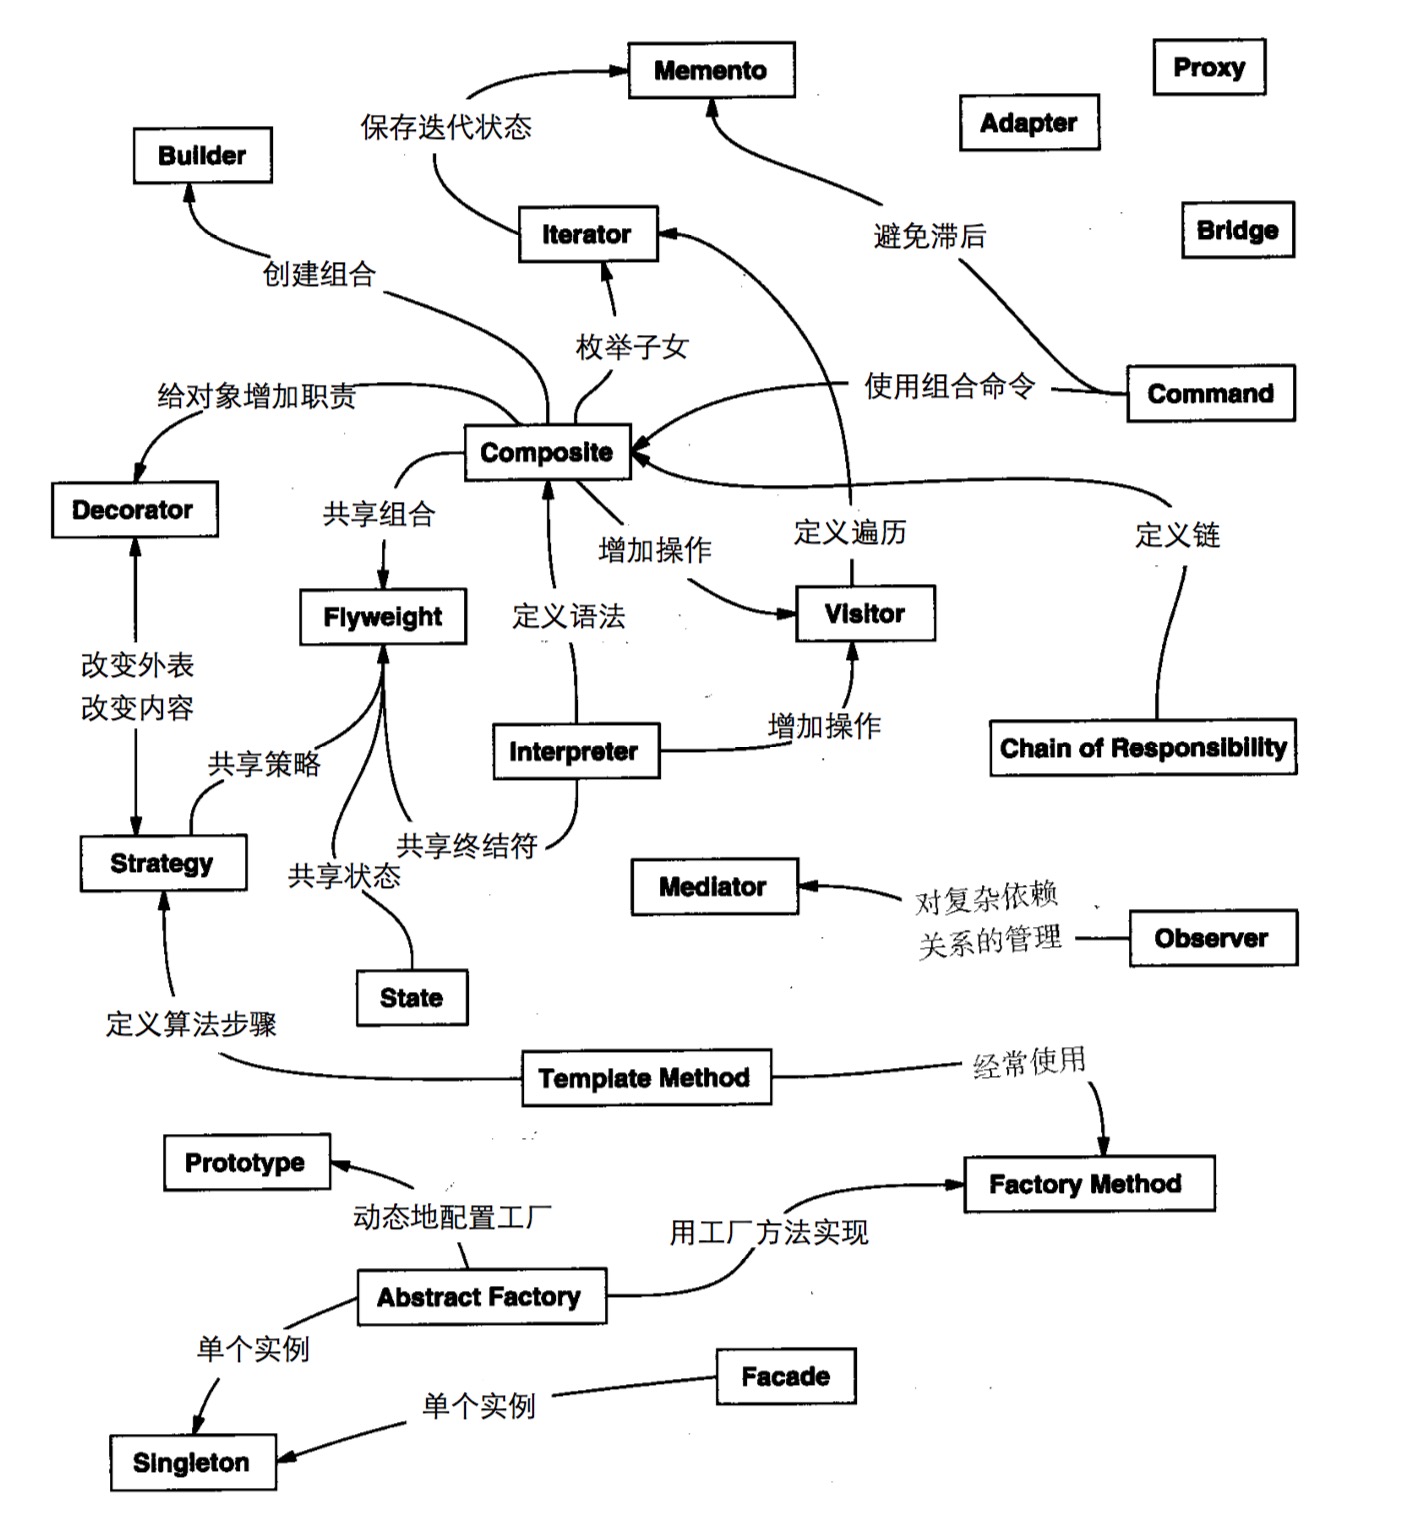
##创建型模式
这六个模式都是与创建对象相关的
- 简单工厂模式(Simple Factory);
- 工厂方法模式(Factory Method);
- 抽象工厂模式(Abstract Factory);
- 创建者模式(Builder);
- 原型模式(Prototype);
- 单例模式(Singleton);
##结构型模式
创建对象后,对象与对象之间的依赖关系,设计好了会为后续代码的维护带来很大的方便。
- 外观模式(Facade);
- 适配器模式(Adapter);
- 代理模式(Proxy);
- 装饰模式(Decorator);
- 桥模式(Bridge);
- 组合模式(Composite);
- 享元模式(Flyweight)
##行为型模式
对象的创建和结构定义好后,就是他们的行为的设计了。
模板方法模式(Template Method);
- 观察者模式(Observer);
- 状态模式(State);
- 策略模式(Strategy);
- 职责链模式(Chain of Responsibility);
- 命令模式(Command);
- 访问者模式(Visitor);
- 调停者模式(Mediator);
- 备忘录模式(Memento);
- 迭代器模式(Iterator);
- 解释器模式(Interpreter)
最近在看的书籍:
- 2020.09.23 《设计数据密集型应用》
曾经看过的书籍:
工具类技术书籍
- 《Developing an ionic Edge》
- 《Angular JS权威教程》(Ari Lerner)
- 《O’Reilly:Python学习手册(第4版)》
- 《Python Cookbook(第3版)中文版》
- 《Vim使用技巧》
- 《JAVA编程思想》
- 《JAVA并发编程实战》
- 《Java JDK 7学习笔记》
- 《大话设计模式(交互启发式教学 谈笑间详解设计模式 让你爱不释手)》 程杰 著
- 《精通CSS+DIV网页样式布局》前沿科技 编著
业务专业相关
- 《流程优化与再造》
思维构建相关
- 《黑客与画家》
- 《大教堂与集市》
- 《重来》
- 《启示录 打造用户喜爱的产品》Marty Cagan著 七印部落 译
- 《从0到1:开启商业与未来的秘密》【美】彼得 蒂尔 Peter Thiel
- 《重构 改善既有代码的设计》 【美】Martin Fowler 著,熊节 译
- 《JavaScript权威指南(第6版)》(美)弗兰纳根 著,淘宝前端团队 译
- 《干法》 【日】稻盛和夫 著,曹岫云 译
- 《失控》 凯文凯利 著,东西文库 译
生活向导
- 《平凡的世界》(路遥)
- 《尼古拉.特斯拉传》(Steve Law)
要看的书籍
- 《集装箱改变世界》
本书从集装箱的发明史娓娓道来,将一个看似平凡的主题衍变成一个个非同寻常的有趣故事,展现了一项技术的进步是如何改变世界经济形态的。它的价值不在于是什么,而在于怎样使用。在集装箱出现之前,美国的沃尔玛、法国的成衣绝对不会遍地开花。而在集装箱出现之后,货运变得如此便宜,以至于某件产品产自东半球,运至纽约销售,远比在纽约近郊生产该产品来得划算。中国也从此登上国际集装箱海运和世界工厂的舞台。读者在享受阅读的同时,还会有趣地发现,即便是一个简单的创新,也会彻底改变我们的生活
Linux shell编程从初学到精通
最近工作时遇到了一个问题,就是查看进行时,只查看某些进行的进程号,若直接用ps aux|grep sms 这样会得到一大堆的东东,所以同事推荐用awk,同
时也提及了sed。
这里抽时间对这两个命令做一个总结,仅为个人学习工作所用。
##sed、awk是什么?
它们是linux\unix系统中的两种功能强大的文本处理工具。- 有一个sed的编辑器,才有了sed(stream editor)这个名字,它是一个将一系列编辑命令作用于一个文本文件的理想工具。
- 由于创建awk的三个作者名称 是Aho、Weinberger和Kernighan,所以得名为AWK,是一种能够对结构化数据进行操作并产生格式化报表的编程语言。
##sed的使用
###使用场合
- 编辑相对交互式广西编辑器而言太大的文件
- 编辑命令太复杂,在交互式文本编辑器中难以输入的情况
- 对文件扫描一遍,但是需要执行多个编辑函数的情况
sed只对缓冲区中的原始文件的副本进行编辑,并不编辑原始的文件。so,若要保存个性后的文件,压根将输出重定向到另一个文件。如:
sed 'sed command' source-file > target-file###调用方式如何没有指定输入文件sed将从标准输入中接受输入
在shell命令行输入命令调用sed,格式为:
sed [option] ‘sed command’ 输入文件
注意此处为单引号将命令引起来将sed命令插入脚本文件后,然后通过sed命令调用它,格式为:
sed [option] -f sed脚本文件 输入文件
将sed命令插入脚本文件后,最常用的方法是设置该脚本文件为可执行,然后直接执行该脚本,格式为:
./sed脚本文件 输入文件
但此命令脚本文件,应该以sha-bang(#!)开头,sha-bang后面是解析这个脚本的程序名。
####sed命令选项及其意义
- -n:不打印所有行到标准输出
- -e:将下一个字符串解析为sed编辑命令,如果只传递一个编辑命令给sed,-e选项可以省略
- -f:表示正在调用sed脚本文件
###命令组成方式
定位文本行和编辑命令两部分组成####定位文本
- 使用行号,指定一行,或指定行号范围
- 使用正则表达式
下面是sed命令定位文本的方法
- x 为指定的行号
- x,y 指定行号范围
- /pattern/ 查询包含模式的行
- /pattern/pattern/ 查询包含两个模式的行
- /pattern/,x 从与模式匹配到x号行之间的行 反之类似
- x,y!查询不包括x和y行号的行
####常用编辑命令
- p 打印匹配行
- = 打印文件行号
- a\ 在定位行号之后追加文本信息
- i\ 在定们行号之前插入文本信息
- d 删除定位行
- c\ 用新文本替换定位文本
- s 使用替换模式替换相应模式
- r 从另一个文件中读广西
- w 将文本写入到一个文件
- y 变换字符
- q 第一个模式匹配完成后退出
- l 显示与八进制ASCII码等价的控制字符
- {} 在定位行执行的命令组
- n 读取下一个输入行,用下一个命令处理新的行
- h 将模式缓冲区的文本复制到保持缓冲区
- H 将模式缓冲区的文本追加到保持缓冲区
- x 互换模式缓冲区和保持缓冲区的内容
- g 将保持缓冲区的内容复制到模式缓冲区
- G 将保持缓冲区的内容追加到模式缓冲区
###实例
我们就用下面这个文件内容作为事例参考:
#!/usr/bin/env python
import os
import sys

if __name__ == "__main__":
    os.environ.setdefault("DJANGO_SETTINGS_MODULE", "test.settings")

    from django.core.management import execute_from_command_line

    execute_from_command_line(sys.argv)
-n 选项的使用
- 使用-n 不输出所有的内容 1p 输出第一行
➜  linuxstudy  sed -n '1p' manage.py2
#!/usr/bin/env python- 打印3到6行
➜  linuxstudy  sed -n '3,6p' manage.py2
import sys

if __name__ == "__main__":
os.environ.setdefault("DJANGO_SETTINGS_MODULE", "test.settings")- 模式匹配
➜  linuxstudy  sed -n '/environ/p' manage.py2
    os.environ.setdefault("DJANGO_SETTINGS_MODULE", "test.settings")
- e 选项的使用
- 打印行号:
    ➜  linuxstudy  sed -n '/env/=' manage.py2
    1
    6

添加e选项:

    ➜  linuxstudy  sed -n -e '/env/p' -e '/env/=' manage.py2
    #!/usr/bin/env python
    1
        os.environ.setdefault("DJANGO_SETTINGS_MODULE", "test.settings")
    6

    `sed不支持多个编辑命令的用法,带多个编辑命令的用法,一般格式为:`

    sed [option] -e 编辑命令 -e 编辑命令 ... -e 编辑命令 输入文件

    将下面命令操作存放到一个后缀为.sed的文件中,让其可执行
    #!/usr/bin/sed -f
    /command/a\
    we append a new line
sed文本定位
- 匹配元字符 $和.
    ➜  linuxstudy  sed -n '/\./p' manage.py2
        os.environ.setdefault("DJANGO_SETTINGS_MODULE", "test.settings")
        from django$.core.management import execute_from_command_line
        execute_from_command_line(sys.argv)
    ➜  linuxstudy  sed -n '/\$/p' manage.py2
from django$.core.management import execute_from_command_line- 元字符进行匹配
    $在正则中表示行尾,但在这里表示最后一行
    sed的基本命令,可以放在单引号外或内都行,根据自己的习惯
    ➜  linuxstudy  sed  '$p' manage.py2 得取最后一行

    ➜  linuxstudy sed  -n '/.*line/p' manage.py2 找出以line结尾的行
! 符号,表示取反,但是不能用于模式匹配的取反
➜ linuxstudy sed -n '2,4!p' manage.py2 不打印2到4行使用行号与关键字匹配限定行范围
  /pattern/,x和x,/pattern/ 这两种形式其实与x,y一样的,只是将x或y代替罢了

  ➜  linuxstudy  sed -n '4,/mana/p' manage.py2  得到的是从第四行起到与mana匹配的行的内容

  if __name__ == "__main__":
      os.environ.setdefault("DJANGO_SETTINGS_MODULE", "hwbuluo.settings")

      from django$.core.management import execute_from_command_line
sed文本编辑
插入文本 i\
  在匹配行的前端插入
  sed '定位i\text' 文件

  修改上面的追加脚本:
  #!/usr/bin/sed -f
  /command/i\
  we append a new line
修改文本 modify.sed c\
  -------------------
  #!/usr/bin/sed -f

  /command/c\
  I modify the file.
  -------------------

  执行:./modify.sed
删除文本 d 与追加和插入修改有所不同,这里在后面不需要添加\
sed '1,3d' manage.py2替换文本 替换文本与修改文本类似,只是修改是对一整行的个性,替换则是对局部进行修改
  s/被替换的字符串/新字符串/[替换选项]

  替换选项及意义:
      g:替换文本中所有出现被替换字符串之处,若不使用此选项,则只替换每行的第一个匹配上的字符串
      p:与-n选项结合,只打印替换行
      w 文件名:表示将输出定向到一个文件

  ➜  linuxstudy  sed -n 's/command/============/p' manage.py2
      from django$.core.management import execute_from_============_line
      execute_from_============_line(sys.argv)

  也可以 linuxstudy  sed -n 's/command/============/2p' manage.py2   来替换每行出现的第几个
##awk的使用
###使用场合
###调用方式
###实例
awk -F ':' 'BEGIN {count=0;} {name[count] = $1;count++;};END {for (i=0;i<NR;i++) print i,name[i]}'   /etc/passwd

0 root
1 daemon
2 bin
3 sys
4 sync
5 games
6 man
7 lp
8 mail

ls -l |awk 'BEGIN {size=0;} {size=size+$5;} END{print "[end]size is",size/1024/1024 ,"M"}'

[end]size is 0.098505 M##日常系统操作
- 将远程文件拷贝到本地
scp username@ip:remote_filepath /local_dir同步目录
rsync -avzr 172.xx.xx.11:/opt/jagent/tomcat* . sudo chown -R fsdevops.fsdevops sms-service/-
ulimit -n -
    $ ps
        -bash: fork: retry: 资源暂时不可用
        -bash: fork: retry: 资源暂时不可用
        -bash: fork: retry: 资源暂时不可用
        -bash: fork: retry: 资源暂时不可用

    IT组哥们分析说是每个用户句柄数只有1024个,目前超了

    ulimit -a 即可查询linux相关的参数
查看进程号
    ps aux|grep sms|awk -F  ' ' '{print $2}'

ps aux|grep sms|awk -F ' ' '{kill $2}'- grep的使用
    cat rmq_bk_gc.log|grep -E -o '\w+'|sort|uniq -c|sort -k 2,1
    -E 正则
    -o 输出 -O 标示出
    sort排序
    uniq group
强制用sudo保存
:w !sudo tee %设置服务自启动
chkconfig
查看某端口被谁占用
   netstat -apn
   netstat -apn|grep 8013
   ps -aux | grep 33514/java
查看文件占用
du -hs .-
   监视指定主机和端口的数据包
   tcpdump tcp port 23 and host 210.27.48.1
防火墙
    hostname
    iptables -t filter -I INPUT -p tcp --dport 27107 -m state --state NEW -j ACCEPT

    sudo iptables -A INPUT -p tcp --dport 13710 -j ACCEPT
    sudo iptables -A OUTPUT -p tcp --sport 13710 -j ACCEPT

    service iptables save
    vim /etc/puppet/puppet.conf

    service puppet restart
    iptables -L
    more /etc/sysconfig/iptables
    vim /etc/sysconfig/iptables
    service iptables reload
      停止防火墙

      sudo su
      service iptables stop
安装telnet
yum install -y telnet查询某类文件
grep netty -R .
查看内存
freecurl 发送请求
  目的1:通过脚本发送post请求。
  答案: curl -d "leaderboard_id=7778a8143f111272&score=19&app_key=8d49f16fe034b98b&_test_user=test01" "http://172.16.102.208:8089/wiapi/score"

  目的2:通过脚本发送post请求,顺便附带文本数据,比如通过"浏览"选择本地的card.txt并上传发送post请求
  答案:  curl  -F "blob=@card.txt;type=text/plain"  "http://172.16.102.208:8089/wiapi/score?leaderboard_id=7778a8143f111272&score=40&app_key=8d49f16fe034b98b&_test_user=test01"
ssh免密码登陆
ssh-keygen -t rsa -P ''

将生成的文件拷到目标主机,交添加到keys文件中

cat sshnopw.pub >> /root/.ssh/authorized_keys- vmstat 相比top,我可以看到整个机器的CPU,内存,IO的使用情况,而不是单单看到各个进程的CPU使用率和内存使用率
    2表示每个两秒采集一次服务器状态,1表示只采集一次。
    procs -----------memory---------- ---swap-- -----io---- -system-- ------cpu-----
     r  b   swpd   free   buff  cache   si   so    bi    bo   in   cs us sy id wa st
     0  0      0 779304  67972 706748    0    0   135    45  538 1117 10  3 86  2  0

     r 表示运行队列(就是说多少个进程真的分配到CPU),我测试的服务器目前CPU比较空闲,没什么程序在跑,当这个值超过了CPU数目,就会出现CPU瓶颈了。这个也和top的负载有关系,一般负载超过了3就比较高,超过了5就高,超过了10就不正常了,服务器的状态很危险。top的负载类似每秒的运行队列。如果运行队列过大,表示你的CPU很繁忙,一般会造成CPU使用率很高。

     b 表示阻塞的进程,这个不多说,进程阻塞,大家懂的。

     swpd 虚拟内存已使用的大小,如果大于0,表示你的机器物理内存不足了,如果不是程序内存泄露的原因,那么你该升级内存了或者把耗内存的任务迁移到其他机器。

     free   空闲的物理内存的大小,我的机器内存总共8G,剩余3415M。

     buff   Linux/Unix系统是用来存储,目录里面有什么内容,权限等的缓存,我本机大概占用300多M

     cache cache直接用来记忆我们打开的文件,给文件做缓冲,我本机大概占用300多M(这里是Linux/Unix的聪明之处,把空闲的物理内存的一部分拿来做文件和目录的缓存,是为了提高 程序执行的性能,当程序使用内存时,buffer/cached会很快地被使用。)

     si  每秒从磁盘读入虚拟内存的大小,如果这个值大于0,表示物理内存不够用或者内存泄露了,要查找耗内存进程解决掉。我的机器内存充裕,一切正常。

     so  每秒虚拟内存写入磁盘的大小,如果这个值大于0,同上。

     bi  块设备每秒接收的块数量,这里的块设备是指系统上所有的磁盘和其他块设备,默认块大小是1024byte,我本机上没什么IO操作,所以一直是0,但是我曾在处理拷贝大量数据(2-3T)的机器上看过可以达到140000/s,磁盘写入速度差不多140M每秒

     bo 块设备每秒发送的块数量,例如我们读取文件,bo就要大于0。bi和bo一般都要接近0,不然就是IO过于频繁,需要调整。

     in 每秒CPU的中断次数,包括时间中断

     cs 每秒上下文切换次数,例如我们调用系统函数,就要进行上下文切换,线程的切换,也要进程上下文切换,这个值要越小越好,太大了,要考虑调低线程或者进程的数目,例如在apache和nginx这种web服务器中,我们一般做性能测试时会进行几千并发甚至几万并发的测试,选择web服务器的进程可以由进程或者线程的峰值一直下调,压测,直到cs到一个比较小的值,这个进程和线程数就是比较合适的值了。系统调用也是,每次调用系统函数,我们的代码就会进入内核空间,导致上下文切换,这个是很耗资源,也要尽量避免频繁调用系统函数。上下文切换次数过多表示你的CPU大部分浪费在上下文切换,导致CPU干正经事的时间少了,CPU没有充分利用,是不可取的。

     us 用户CPU时间,我曾经在一个做加密解密很频繁的服务器上,可以看到us接近100,r运行队列达到80(机器在做压力测试,性能表现不佳)。

     sy 系统CPU时间,如果太高,表示系统调用时间长,例如是IO操作频繁。

     id  空闲 CPU时间,一般来说,id + us + sy = 100,一般我认为id是空闲CPU使用率,us是用户CPU使用率,sy是系统CPU使用率。

wt 等待IO CPU时间。- jstat java虚拟机 垃圾回收状态查看
    命令格式
    jstat命令命令格式:
    jstat [Options] vmid [interval] [count]
    参数说明:
    Options,选项,我们一般使用 -gcutil 查看gc情况
    vmid,VM的进程号,即当前运行的java进程号
    interval,间隔时间,单位为秒或者毫秒
    count,打印次数,如果缺省则打印无数次
    示例说明
    示例
    通常运行命令如下:
    jstat -gc 12538 5000
    即会每5秒一次显示进程号为12538的java进成的GC情况,
    显示内容如下图:

    jstat -gc 19014 1000
     S0C    S1C    S0U    S1U      EC       EU        OC         OU       MC     MU    CCSC   CCSU   YGC     YGCT    FGC    FGCT     GCT
    10752.0 10752.0  0.0   5293.9 65536.0  65224.5   175104.0     16.0    13056.0 12799.5 1536.0 1495.2      1    0.009   0      0.000    0.009
    10752.0 10752.0  0.0   5293.9 65536.0  65224.5   175104.0     16.0    13056.0 12799.5 1536.0 1495.2      1    0.009   0      0.000    0.009

    结果说明
    显示内容说明如下(部分结果是通过其他其他参数显示的,暂不说明):
             S0C:年轻代中第一个survivor(幸存区)的容量 (字节)
             S1C:年轻代中第二个survivor(幸存区)的容量 (字节)
             S0U:年轻代中第一个survivor(幸存区)目前已使用空间 (字节)
             S1U:年轻代中第二个survivor(幸存区)目前已使用空间 (字节)
             EC:年轻代中Eden(伊甸园)的容量 (字节)
             EU:年轻代中Eden(伊甸园)目前已使用空间 (字节)
             OC:Old代的容量 (字节)
             OU:Old代目前已使用空间 (字节)
             PC:Perm(持久代)的容量 (字节)
             PU:Perm(持久代)目前已使用空间 (字节)
             YGC:从应用程序启动到采样时年轻代中gc次数
             YGCT:从应用程序启动到采样时年轻代中gc所用时间(s)
             FGC:从应用程序启动到采样时old代(全gc)gc次数
             FGCT:从应用程序启动到采样时old代(全gc)gc所用时间(s)
             GCT:从应用程序启动到采样时gc用的总时间(s)
             NGCMN:年轻代(young)中初始化(最小)的大小 (字节)
             NGCMX:年轻代(young)的最大容量 (字节)
             NGC:年轻代(young)中当前的容量 (字节)
             OGCMN:old代中初始化(最小)的大小 (字节)
             OGCMX:old代的最大容量 (字节)
             OGC:old代当前新生成的容量 (字节)
             PGCMN:perm代中初始化(最小)的大小 (字节)
             PGCMX:perm代的最大容量 (字节)
             PGC:perm代当前新生成的容量 (字节)
             S0:年轻代中第一个survivor(幸存区)已使用的占当前容量百分比
             S1:年轻代中第二个survivor(幸存区)已使用的占当前容量百分比
             E:年轻代中Eden(伊甸园)已使用的占当前容量百分比
             O:old代已使用的占当前容量百分比
             P:perm代已使用的占当前容量百分比
             S0CMX:年轻代中第一个survivor(幸存区)的最大容量 (字节)
             S1CMX :年轻代中第二个survivor(幸存区)的最大容量 (字节)
             ECMX:年轻代中Eden(伊甸园)的最大容量 (字节)
             DSS:当前需要survivor(幸存区)的容量 (字节)(Eden区已满)
             TT: 持有次数限制
             MTT : 最大持有次数限制
jstack pid java查看java程序的状态
grep 正则输出
    grep -o -E "[0-9]{11}" xx.log

    cat error.log |grep 'Failed to invoke the method'|grep '2015-12-08 20'|awk -F'Failed to invoke the method' '{print $2}'|awk '{print $1}'  |sort|uniq -c
删除某些文件
find ./ -name 'xx.log' |xargs rm -rf删除某个文件外的其它文件
  ls | grep -v keep | xargs rm #删除keep文件之外的所有文件
  说明: ls先得到当前的所有文件和文件夹的名字, grep -v keep,进行grep正则匹配查找keep,-v参数决定了结果为匹配之外的结果,也就是的到了keep之外的所有文件名,然后 xargs用于从 标准输入获得参数 并且传递给后面的命令,这里使用的命令是 rm,然后由rm删除前面选择的文件
查看磁盘信息
    查看当前文件夹下所有文件大小(包括子文件夹)
       ➜  ~  du -sh
        47G    .
    查看指定文件夹大小
       # du -hs ftp
       6.3G    ftp

    查看磁盘空间大小命令
    df -h Df命令是linux系统以磁盘分区为单位查看文件系统,可以加上参数查看磁盘剩余空间信息,命令格式: df -hl 显示格式为: 文件系统 容量 已用 可用 已用% 挂载点 Filesystem Size Used Avail Use% Mounted on /dev/hda2 45G 19G 24G 44% / /dev/hda1 494

    df   -h

    Df命令是linux系统以磁盘分区为单位查看文件系统,可以加上参数查看磁盘剩余空间信息,命令格式:

    df -hl

    显示格式为:

    文件系统              容量 已用 可用 已用% 挂载点

    Filesystem            Size Used Avail Use% Mounted on

    /dev/hda2              45G   19G   24G 44% /
gz解压
gzip -x ...proc 启动应用程序时,找不到log去哪了
ls -l /proc/63220/fd|grep log
- 查看内存信息
#linux 下安装软件
- yum
    指定源进行安装
yum install 软件名 --enablerepo=安装包地址- 重新安装JDK
    删除JDK:
        rpm -qa | grep jdk|xargs sudo rpm -e --nodeps
    download jdk
     wget -c -P ./ http://download.oracle.com/otn-pub/java/jdk/8u65-b17/jdk-8u65-linux-x64.rpm?AuthParam=1448637274_af870ccf6c2c78750a5977e6da301744

     安装

     以JDK1.8为例

     拷贝到/usr/share下,mv jdk-8u65-linux-x64.rpm /usr/share

     用rpm -ivh命令安装


     配置环境变量

     在/etc/profile下增加

     # set Java environment
     JAVA_HOME=/usr/share/jdk-8u65-linux-x64
     PATH=$JAVA_HOME/bin:$PATH
     CLASSPATH=.:$JAVA_HOME/lib/dt.jar:$JAVA_HOME/lib/tools.jar
     export JAVA_HOME
     export PATH
     export CLASSPATH


     测试

     [root@localhost ~]# echo $JAVA_HOME
     /usr/share/jdk1.6.0_43
     [root@localhost ~]# echo $PATH
     /usr/share/jdk1.6.0_43/bin:/usr/lib64/qt-3.3/bin:/usr/local/sbin:/usr/local/bin:/sbin:/bin:/usr/sbin:/usr/bin:/root/bin
     [root@localhost ~]# echo $CLASSPATH
     .:/usr/share/jdk1.6.0_43/lib/dt.jar:/usr/share/jdk1.6.0_43/lib/tools.jar

     [root@localhost ~]# java -version
     java version "1.6.0_43"
     Java(TM) SE Runtime Environment (build 1.6.0_43-b01)
     Java HotSpot(TM) 64-Bit Server VM (build 20.14-b01, mixed mode)

    Managing Java

    sudo update-alternatives --config java
    有 2 个候选项可用于替换 java (提供 /usr/bin/java)。
数据库操作
mysql授权
ALL PRIVILEGES ON *.* TO 'root'@'localhost' IDENTIFIED BY 'root' WITH GRANT OPTION;
安装apt-get
http://everyday-tech.com/apt-get-on-centos/
lsof
lsof语法格式是:
lsof [options] filename
复制代码
lsof abc.txt 显示开启文件abc.txt的进程
lsof -c abc 显示abc进程现在打开的文件
lsof -c -p 1234 列出进程号为1234的进程所打开的文件
lsof -g gid 显示归属gid的进程情况
lsof +d /usr/local/ 显示目录下被进程开启的文件
lsof +D /usr/local/ 同上,但是会搜索目录下的目录,时间较长
lsof -d 4 显示使用fd为4的进程
lsof -i 用以显示符合条件的进程情况
lsof -i[46] [protocol][@hostname|hostaddr][:service|port]
46 –> IPv4 or IPv6
protocol –> TCP or UDP
hostname –> Internet host name
hostaddr –> IPv4地址
service –> /etc/service中的 service name (可以不止一个)
port –> 端口号 (可以不止一个)
traceroute IP
监控某台机器到某IP的链路的连通性
    nohup ping -W 1 172.31.xx.xx &>/tmp/ping.log &
    crontab -e
* * * * * echo "`date +%d-%H:%M`" >> /tmp/ping.log##环境
Django,Mysql,空间数据是通过Google地图和高德地图进行采集的
$ mysql -V |
##需求描述
mysql中存储了一些地理空间点类型的数,要进行周边查询。
##MySQL空间相关的局限性
MySQL空间扩展的功能仅支持包络框相关的操作(MySQL称之为最小边框,或简称为 MBR)。也就是说,MySQL符合OGC标准。
目前,MySQL没有实现Contains,Crosses,Disjoint,Intersects,Overlaps,Touches函数,可以通过MBR来实现同样效果操作。
也就是说,在MySQL进行如contains类似的空间查询时,可以通过bbcontains来实现同样效果的操作。
注意:
只有MyISAM引擎的MySQL表才真正的支持空间索引(R-trees)。也就是说,当你要使用MySQL提供的空间扩展时,你要在快速查询空间数据和数据的完整性之间做一个选择 - MyISAM的表不支持事务和外键约束。 |
##数据库配置
空间表引擎 Engine:InnoDB
###创建数据库
mysql>GRANT ALL PRIVILEGES ON *.* TO project_test@localhost IDENTIFIED BY 'project_test' WITH GRANT OPTION; |
第一句增加了一个 project_test 用户授权通过本地机(localhost)访问,密码“project_test”。
第二句则是授与 project_test 用户从任何其它主机发起的访问(通配符%)。
###配置数据源
'default': { |
##数据模型的构建
from django.contrib.gis.db import models as gismodels |
Django Geographic framework 1.7
GeoDjango打算做世界级的地理学Web框架。它的目标是尽可能方便是的利用强大空间数据构建GIS Web 应用。
###GeoQuerySet API
class GeoQuerySet([model=None])
####空间查询
正如使用QuerySet API时一样,在过滤器链(chaining filters)上加上GeoQuerySet进行筛选。除了通常的字段(Field lookups)查询,它还提供了空间字段GeometryField的查询。
可以在这里查看空间查询介绍
下面Django对不同数据库 空间查询操作支持统计表:
    Lookup Type            PostGIS    Oracle    MySQL [7]    SpatiaLite

    bbcontains            X                X             X
    bboverlaps            X                 X             X
    contained            X                 X             X
    contains            X         X        X             X
    contains_properly    X
    coveredby            X         X
    covers                X         X
    crosses                X                               X
    disjoint            X         X        X             X
    distance_gt            X         X                      X
    distance_gte        X         X                      X
    distance_lt            X         X                      X
    distance_lte           X         X                      X
    dwithin                X         X
    equals                X         X        X             X
    exact                X         X        X             X
    intersects            X         X        X             X
    overlaps            X         X        X             X
    relate                X         X                     X
    same_as                X         X        X             X
    touches                X         X        X             X
    within                X         X        X             X
    left                X
    right                X
    overlaps_left       X
    overlaps_right      X
    overlaps_above      X
    overlaps_below      X
    strictly_above      X
    strictly_below      X
####我这里只关注一下对mysql的空间操作支持
按我们的需要我们选用
within
bbcontains
支持:
PostGIS,MySQL,SpatiaLite查询数据库中空间数据的bbox包含在指定的空间bbox内的数据。
 数据库         操作

 PostGIS       poly ~ geom
 MySQL         MBRContains(poly,geom)
 SpatiaLite    MbrContains(poly,geom)
bboverlaps
支持:
PostGIS,MySQL,SpatiaLite查询数据库中空间数据的bbox与指定的空间bbox相交的数据。
 数据库         操作

 PostGIS       poly && geom
 MySQL         MBROverlops(poly,geom)
 SpatiaLite    MbrOverlops(poly,geom)
contained
支持:
PostGIS,MySQL,SpatiaLite查询数据库中空间数据的bbox完全包含指定的空间bbox的数据。
 数据库         操作

 PostGIS       poly @ geom
 MySQL         MBRWithin(poly,geom)
 SpatiaLite    MbrWithin(poly,geom)
contains
支持:
PostGIS,Oracle,MySQL,SpatiaLiteExample:
Zipcode.objects.filter(poly__contains=geom)查询数据库中空间数据包含指定的空间图形的数据。
 数据库         操作

 PostGIS       ST_Contains(poly, geom)
 Oracle        SDO_CONTAINS(poly, geom)
 MySQL         MBRContains(poly, geom)
 SpatiaLite    Contains(poly, geom)
disjoint
支持:
PostGIS,Oracle,MySQL,SpatiaLiteExample:
Zipcode.objects.filter(poly__disjoint=geom)查询数据库中与指定的空间图形相离的空间数据。
 数据库         操作

 PostGIS       ST_Disjoint(poly, geom)
 Oracle        SDO_GEOM.RELATE(poly, geom)
 MySQL         MBRDisjoint(poly, geom)
 SpatiaLite    Disjoint(poly, geom)
equals
支持:
PostGIS,Oracle,MySQL,SpatiaLiteexact,same_as
支持:
PostGIS,Oracle,MySQL,SpatiaLiteintersects
支持:
PostGIS,Oracle,MySQL,SpatiaLite查询数据库中与指定的空间图形相交的空间数据。
Example:
Zipcode.objects.filter(poly__intersects=geom)
        数据库         操作

        PostGIS       ST_Intersects(poly, geom)
        Oracle        SDO_OVERLAPBDYINTERSECT(poly, geom)
        MySQL         MBRIntersects(poly, geom)
        SpatiaLite    Intersects(poly, geom)
overlaps
支持:
PostGIS,Oracle,MySQL,SpatiaLite
touches
支持:
PostGIS,Oracle,MySQL,SpatiaLiteExample:
Zipcode.objects.filter(poly__touches=geom)查询与指定的空间几何图形相接的数据。
    数据库         操作

    PostGIS       ST_Touches(poly, geom)
    Oracle        SDO_TOUCH(poly, geom)
    MySQL         MBRTouches(poly, geom)
    SpatiaLite    Touches(poly, geom)
within
支持:
PostGIS,Oracle,MySQL,SpatiaLiteExample:
Zipcode.objects.filter(poly__within=geom)查询包含在指定的空间几何图形中的数据。
    数据库         操作

    PostGIS       ST_Within(poly, geom)
    Oracle        SDO_INSIDE(poly, geom)
    MySQL         MBRWithin(poly, geom)
    SpatiaLite    Within(poly, geom)
现在知道了要用 within 来查询数据,另一个问题来了,如何生成半径大小为R中心坐标为(x,y)的geom呢。
####创建空间几何图形
可以通过多种方式创建GeosGeometry。第一种方法,就是通过一些参数直接实例化。
- 下面是分别通过WKT,HEX,WKB和GeoJSON方式直接创建 Geometry 的方法:
In [30]: pnt = GEOSGeometry('POINT(5 23)') |
- 另一种方式就是通过特定类型的空间几何对象的构造器来进行创建该类型的Geometry实例
In [34]: from django.contrib.gis.geos import Point |
In [37]: from django.contrib.gis.geos import fromstr,fromfile |
####实现查询周边几何点的功能
通过上面的学习,在Django中实现mysql数据的周边查询只能通过模糊的查询,
我们这里通过构建一个包络框进行模糊查询:
- 构建一个包络框
from django.contrib.gis.geos import (Polygon,Point) |
- 进行within查询
AppPoint.objects.filter(point__within=buffer) |
- 问题
这里给的半径通常是米为km,但是这个构建buffer的方法需要的参数是一个度。
degree=l*180/(math.pi*6371)##测试方法和数据
def get_point(point,r): |
其中点与点间的距离方法distance在django中解释为:
Returns the distance between the closest points on this Geometry |
下面是测试数据:
b = [[116.27497,39.95708,2573], |
##总结
from django.contrib.gis.geos import (Polygon,Point) |
queryset.extra(select={‘distance_factor’: “SQRT(POWER(ABS(X(point) - “+str(x)+”),2) + POWER(ABS(Y(point) - “+str(y)+”),2))”}).order_by(‘distance_factor’)
|
rps[0].point.distance(rps[1].point)
python: GeometryComponentFilter.cpp:35: virtual void geos::geom::GeometryComponentFilter::filter_ro(const geos::geom::Geometry*): Assertion `0’ failed.
线上直接使用distance时报错。 |
(‘…..python’, 0.0071949078163964595)
(‘self’, 0.0071949078163964595)
故处些最终到终心点的距离使用了 `distance_factor` 来代替。 |
    var a = 6378245.0
    var ee = 0.00669342162296594323

    function out_of_china(lat,lon){
        if (lon < 72.004 || lon > 137.8347)
            return true
        if (lat < 0.8293 || lat > 55.8271)
            return true
    }
    function transformlat(x, y) {

        var result = -100.0 + 2.0 * x + 3.0 * y + 0.2 * y * y + 0.1 * x * y + 0.2 * Math.sqrt(Math.abs(x))
        result += (20.0 * Math.sin(6.0 * Math.PI * x) + 20.0 * Math.sin(2.0 * Math.PI * x)) * 2.0 / 3.0
        result += (20.0 * Math.sin(Math.PI * y) + 40.0 * Math.sin(Math.PI / 3.0 * y)) * 2.0 / 3.0
        result += (160.0 * Math.sin(Math.PI / 12.0 * y) + 320.0 * Math.sin(Math.PI / 30.0 * y)) * 2.0 / 3.0
        return result
    }
    function transformlon(x, y) {
        var result = 300.0 + x + 2.0 * y + 0.1 * x * x + 0.1 * x * y + 0.1 * Math.sqrt(Math.abs(x))
        result += (20.0 * Math.sin(6.0 * Math.PI * x) + 20.0 * Math.sin(2.0 * Math.PI * x)) * 2.0 / 3.0
        result += (20.0 * Math.sin(Math.PI * x) + 40.0 * Math.sin(Math.PI / 3.0 * x)) * 2.0 / 3.0
        result += (150.0 * Math.sin(Math.PI / 12.0 * x) + 300.0 * Math.sin(Math.PI / 30.0 * x)) * 2.0 / 3.0
        return result
    }

    function wgs2gcj(wgslat, wgslon) {
        if (out_of_china(wgslat, wgslon)) {
            return [wgslat, wgslon]
        }
        var lat = transformlat(wgslon - 105.0, wgslat - 35.0)
        var lon = transformlon(wgslon - 105.0, wgslat - 35.0)
        var rad_lat = Math.PI / 180.0 * wgslat
       var  magic = Math.sin(rad_lat)
        magic = 1 - ee * magic * magic
        var sqrt_magic = Math.sqrt(magic)
        lat = (180.0 * lat) / (Math.PI * (a * (1 - ee)) / (magic * sqrt_magic))
        lon = (180.0 * lon) / (Math.PI * a * Math.cos(rad_lat) / sqrt_magic)
        var chnlat = wgslat + lat
        var chnlon = wgslon + lon
        return [chnlat, chnlon]
    }
##参考
>0. [JAVSCRIPT Math](http://www.w3school.com.cn/jsref/jsref_obj_math.asp)

>1. [MySQL空间数据库–查询点到多点间的最短路径](http://www.javabloger.com/article/mysql-spatial-database.html)

>2. [W3 Geolocation API Specification](http://www.w3.org/TR/geolocation-API/#position_interface)

>3. [关于百度map和高德map,关于map坐标系](http://wangsheng2008love.blog.163.com/blog/static/78201689201461674727642/)

>4. [iOS 火星坐标相关整理及解决方案汇总](http://it.taocms.org/04/507.htm)
现在在你的工具箱中有很多工具,让我们来谈谈开发一个真正的手机应用。Instagram是一个非常受欢迎的照片分享应用。使这些照片更加有趣并且展示一些Ionic功能,我们将会涉及到一个我们开发应用,它叫 Trendicity。这个应用以多种方式获取和展示Instagram的照片。
一种方式就是根据照片的位置在地图上进行展示。另一种方式就是将照片展示在可以滑动的卡片上,并且用户可以标示出喜欢的照片。最后一种方式,我们以列表的形式展示照片和更多有关照片信息。
这个完整的Trendicity应用可以在Github上找到。你可以下载它并在你的浏览器或者设备或仿真器上运行。
Trendicity应用是作为一个side menu 应用建成的,可是,它也很好的结合了tabs方式。我们将会从几方面去讨论这个应用。Side Menu和用户的操作选项,搜索功能,和加载服务的使用和(地图示图,卡片视图和列表视图)tabs。
我们通过构建这个应用来深入了解代码。
##Side menu
侧边菜单由以下菜单项构成:
- HOME
- Favorites
- About
- Login/Logout
下面是Trendicity侧边菜单的截图。关于怎么样实现侧边菜单和路由时一直带着它的细节,请看第四章:实现侧边菜单和配置路由。
##Home
HOME菜单选项点击时会调用HomtCtrl和展示地图Tab。地图上将会展示附近的一些图片。
##Favorites
大体上,Trendicity应用的收藏功的实现有三部分组成:FavoritesService,FavoritesCtrl和favorites.html模版。
收藏功能有两种类型的照片会进行收存放:用户生成的和自己收藏的。前者是通过add-favorite模态窗口添加的,后者是通过地址位置直接关联到Instagram相片的。
这一部分,我们将会实际操作创建和删除收藏,看一下收藏功能是如何实现及FavoritesCtrl和FavoritesServices之间是如何交互的。
###收藏列表
收藏数据在一个列表中展现。当用户进入这个视图,会触发$ionicView.enter事件,这个视图中的数据将自动刷新:
$scope.$on('$ionicView.enter',function(){ |
列表中的每一条收藏条目点击时都会在此相片的地理位置为中心定位到地图上。下面是收藏视图中展示收藏数据的代码:
<ion-list> |

添加一些友好的提示信息,当没有收藏信息要展示时,做如下操作:
<!-- Display message when no favorites exist --> |

###添加收藏
为了保持代码的可维护性,我们决定将开发添加收藏功能的的代码进行解藕合。因此,我们将它拆分成了 FavoritesCtrl,FavoritesService,add-favorite.html模版,和add-favorite-form指令,让它们组合到一起完成这个功能。
添加收藏的动作,从点击右上角的’+’号打开一个添加收藏的模态窗口。
<ion-nav-buttons side="right"> |
点击这个按钮会触发FavoriteCtrl的showModalAddFavorite()方法,它会打开添加收藏的模态窗口。
$scope.showModalAddFavorite = function(){ |
模态窗口中的内容都是有add-favorite-form指令负责生成。
<ion-content> |

addFavoriteForm指令会在其内部处理onSubmit。当这个表单填写的没有问题提交时,会调用addFavoriteForm中的submit方法。也就是说,一旦表单没有问题,指令会调用submit方法,通过调用他的on-submit属性。
现在,指今如何知道去哪里找到addFavorite(favorite)方法呢?
当我们初始化模态时,会将FavoriteCtrl的作用域一并传入。因此,这个模态的作用域是继承自它的父作用域(即收藏视图的作用域);
$ionicModal.fromTemplateUrl('templates/modals/add-favorite.html', { |
这样,addFavorite()方法已经与控制器的作用域相关联:
// Add a new favorite using the service |
当调用FavoritesService’s add()方法后,将会更新收藏列表并具隐藏add-favorite模态。
###添加收藏表单指令
addFavoriteForm指令使用templates/directives/add-favorite-form.html作为它的模版。这个视图包含了表单的基础验证:
<form name="formAddFavorite" no-validate> |
“Add”按钮会调用命令的submit()方法,会添加一个$attempt字段到表单中,标示用户已经最近已经提交了一次这个表单。这个字段被用来高亮不合法和没有输入的输入选项。
最后,当这个表单验证通过后,指令会通过模态中的一个属性调用onSubmit()方法:
$scope.submit = function() { |

而且,在这个模态关闭时,其中添加收藏的表单会自动清空。它是通过监听modal.hidden事件来进行实现的:
$scope.$on('modal.hidden', function() { |
###删除收藏
当你滑动收藏条目时就可以进行删除收藏操作。

点击删除按钮,将会调用FavoritesCtrl的deleteFavorite()方法删除当前收藏的引用。在控制器这边,这个方法会调用FavoritesService的delete方法,将收藏列表中的当前操作的收藏项删除。
// Delete a favorite using the service and update scope var |
###收藏服务
FavoritesService是用标准方式来处理Trendicity中与收藏相关的服务。它将收藏相关逻辑与Trendicity其它功能隔离开。用这种方式的另一个好处就是FavoritesService服务可以在任何一个 Controller中使用。像我们在列表视图中实现的那样,这个服务被用来收藏自己喜欢的地理位置。
这个服务提供了三个方法:add(),getFavorites()和delete()
正如它们的名字叫的那样,getFavorites()会直接返回当前本地的所有收藏。
添加收藏时的处理方式根据收藏的类型而定。对于人们经常收藏的城市或区域,这个类型的收藏会用GeolocationService的addressToPosition()方法获取地理坐标。这个实现我们在稍后章节中会进行讨论。当获取到了地址经纬度,这个收藏会统一格式化一种结构存储到本地的收藏数组中。
var address = favorite.city + ', ' + favorite.region; |
针对具体的收藏,收藏会在列表视图的控制器中进行合适的格式化处理,和用户添加的收藏的处理过程相信,存放到本地收藏数据中。
var newLocation = { |
为了确保准确定位,这个服务为第一个收藏生成了一个对应的ID。每一个id都是根据当前系统的时间生成的:
this.add = function (favorite) { |
删除收藏的工作通过使用lodash的remove()方法实现。删除了收藏后,更新本地收藏并将最新的收藏列表返回。
// DELETE |
##About
‘About’菜单选项点击时会滑出界面,包含一些应用的介绍信息。这个页面会在应用程序第一次加载时显示。


##Login/Logout
当用户还没有登陆要登陆时,点击菜单的’Login’时会显示登陆界面。一旦用户登陆后,再点开菜单,’Logout’选项将出展示。
下面是www/templates/menu.html部分代码片断,展示了如何用ng-show和ng-hide实现上述功能。
<ion-item menu-close class="item-icon-left" ng-click="login()" ng-hide="isLoggedIn()"> |
你可以在www/controllers/app.js文件中找到isLoggedIn,login和logout方法:
// Determine if the user is logged into Instagram |
isLoggedIn方法会调用InstagramService的isLoggedIn()方法来获取当前登陆状态。退出方法会调用InstagramService的logout()方法来进行登记退出动作。我们会在第八章讲解更多关于InstagramService相关的内容。
为了做更多和Instagram相关并有趣的事情,我们需要用户登陆到Instagram。为了实现这个,我们使用一个$ionicModal显示为什么让用户登陆的简要的描述。当选择了登陆选项,login方法被调用,用户会看到一个登陆模态。

// Create the login modal that we will use later |
通常,登陆页面像下面截图中展示一样。但是由于我们要与Instagram集成,我们需要OAuth的方式进行登陆。
<ion-modal-view id="login"> |
用Oauth代替传统的登陆方式,让用户知道一旦登陆到了Instagram,他们能做哪些事情。一旦用户确定登陆到Instagram,我们会调用www/controllers/app.js中的loginToInstagram方法:
// Perform the OAuth login to Instagram |
这个方法将会用InAppBrowser Cordova插件执行OAuth授权。我们会使用这个插件打开一个登陆到Instagram窗口。Trendicity应用没有对用户名和密码进行处理。

##Search
搜索图标就是在列表或卡片视图的右上角的放大镜图标。用户有以下查询选项:
- Trending - 按当前在Instagram上帖子的受欢迎程序进行排序。
- Nearby - 当前用户所在位置1KM范围内发布的帖子。
- My Feed - 当前用户提供给Instagram的信息。
- My Liked Posts -当前用户喜欢的帖子。

在HomeCtrl中,我们设置了查询功能。为了关注搜索功能,下面代码进行稍微的压缩。
首先,我们定义了一些作用域变量来保存帖子和查询变量。我们使用了两个javascript对象来存放,所以当值发生变化时,对象不会丢失。
接下来,我们设置$scope.getPosts方法,它将会根据查询值决定哪些查询方法会被调用。
$scope.getPosts = function(value) { |
通过$watch监听ionicPopover中查询变量值的变化来及时调用$scope.getPosts方法来进行查询。
$scope.updatePosts = function (searchValue) {
  $scope.getPosts(searchValue);
  $scope.closePopover();
  $ionicScrollDelegate.scrollTop();
};

$scope.$watch('search.value', function(newValue) {
    // Triggered when user changes search value
    $scope.updatePosts(newValue);
});
为了实现ionicPopover,我们首先需要通过 fromTemplateUrl 方法加载 html 模版。我们在这里将其作用域设置为当前作用域。当template加载时,我们将popover设置到这个作用域中,方便我们后面进行调用。
$ionicPopover.fromTemplateUrl('templates/search.html', { |
下面这段 search.html 模版片段。我们使用了ion-popover-view 组件定义这个视图。我们使用 ion-header-bar 组件展示弹出窗口的标题。我们将 ion-radio 组件列表放到 ion-content 组件中。ion-radio组件选择后,会作为搜索参考值。
<ion-popover-view> |
当用户点击在templates/home.html中定义的导航按钮时 这个 ionicPopover 将会弹出。下面地这段代码:
<ion-nav-buttons side="right"> |
由上面代码可以看到,当用户点击Search图标时,会调用openPopover方法。我们要做的就是让popover显示。当选择了一个值时,将会调用closePopover方法,在这个方法中,我们要确认popover是已经定义并是打开的。如何条件满足,我们就将其关闭。最后一件事情就是为popover设置一个$destroy监听,当popover被从Dom中移除时调用。
$scope.openPopover = function($event) { |
##加载服务
当照片进行加载时,用户会不知道应用在做什么,我们应该通知用户当前是在加载数据。我们可以使用$ionicLoading组件来完成这件事情。

一种聪明的方式就是将 $ionicLoading 组件调用用放在一个HTTP拦截器中。下面是我们压缩后的代码:
|
当HTTP请求发生时,request方法将会被调用。这里我们显示文字 “Loading”。为了避免依赖死循环,我们需要用Angular $injector组件来获取$ionicLoading服务。
当HTTP请求出现错误时,这里会调用requestError方法。我们会调用hideLoadingModalIfNecesary()方法,这个方法会检查是否有HTTP请求在被调用,如果没有ionicLoading服务会将自己隐藏。
当HTTP响应成功时,会调用response方法。之后做的事情与错误时的处理方法类似。
当HTTP响应错误时,会调用responseError方法。之后做的事情与上面两种情况处理方法类似。
为了使我们的HTTP拦截器生效,我们需要让AngularJS知道它的存在。一般我们会在www/app.js中做这件事情。这里是我们将拦截器通过$httpProvider添加到拦截器数据中的方法:
.config(function($httpProvider) { |
注意,这里我们没有显示真正的提示信息,只是在www/app.js中设置了一个默认信息:
.constant('$ionicLoadingConfig', { |
我们在第七章会详细讲解:设计应用。现在,我们只是想告诉你为什么不向ionicLoading show方法中传入信息。
##Map视图选项
将当前提交的信息在一个可以交互的地图上展示。一个标记会将用户的位置标在地图上。别的照片按它的位置展现在地图上。当点击这个这个标记时,相关联的照片会展现出来。如果你移动地图到一个位置 ,然后点击右上角的刷新图标;就会加载当前位置周边的照片。若想了解如何实现的,请看第五章:在ionic上集成地图。
##Card实图选项
卡片视图将以卡片叠加的方式来展现照片。若用户不喜欢当前的照片,可以将图片向左侧拖拽或划动。如果喜欢的话可以向右侧拖拽或划动。
这些可以摆动的卡券与非常受欢迎的手机应用Tinder相似。这种类似的实用的功能在Tinder中经常会被用到。
Drify(该公司负责我们的ionic技术)创始人之一Max Lynch已经创建了一个划动卡片的库,这个库经常会被ionic开发团队引用。在ionic中这样的效果展示通常会比较受欢迎的。
这个类库用CSS的动画来实现卡片左右拖拽和摆动的效果。他也使用了一个物理样式动化效果库Collide来实现将图片下拉时的动画效果。
在使用Tinder卡片库之前,一个非常相似的卡片划动效果被创建。我们只是在这里提一下它,在你看到这块时不要好奇。我们在这里没有涉及到这个库。
###工作文件
与该视图相关的文件位置在:www/templates/tab-card.html,www/templates/card-intro.html,www/js/controllers/card.js和www/js/directives/no-touch-move.js。
###popup介绍
当导航到卡片实图时,我们决定弹出展示说明信息,来向用户介绍和让他们熟悉如何使用卡片的操作。
我们使用$ionicPopup服务来展示Ionic样式的弹出窗信息。这个服务允许你定义四种类型的弹出窗:
show(选项) :通过加载的选项设置来完全自定义弹出窗
alert(选项) :带有一个按钮的弹出窗
confirm(选项):带有确认信息和“取消”和“确认”铵钮的弹出窗
prompt(选项):和confirm一样,但是多出一个与用户交互的输入框。
为我们Trendicity应用,自定义了一个弹出窗如:
// Show explanation message |
弹出窗的信息体部分通过template和templateUrl选项进行定义。我们这里单独定义这个模版文件:templates/card-intro.html
我们的模版文件中包含一个划动的盒子,可以流畅的在照片与照片之间进行划动。
<ion-slide-box does-continue="false" show-pager="false" delegate-handle="card-intro-slidebox" ng-init="disableSlideBox()"> |
这个盒子组件是由AngularJS服务$ionicSlideBoxDelegate生成。这个服务允许你控制这个组件的行为,如划动时的效果和控制是否自动播放。另外当再次渲染这个盒子时调用update()方法。
我们这里,禁止照片的自动切换和用户划动,而所有的操作只能通过铵钮来进行完成。
// Disable intro slidebox sliding |
弹出窗口提供了一个回调onTap,这里可以让用户去自己做一些事情。如果当前是第一个照片,点击“Next”铵钮,我们通过调用$ionicSlideBoxDelegate.$getByHandle(‘card-intro-slidebox’)实例的next()打开下一张照片,并且修改铵钮的文字为”OK”同时防止弹出窗口关闭。另外,当在最后一个照片时,我们会调用return并关闭弹出窗口。
最后,每次用户访问卡片视图时,我们会查看一下本地存储seenCardIntro的值来判断用户是否已经看这个卡片。
###Card视图
在www/templates/tab-card.html文件中,我们会展示卡片集合。我们通过ng-repeat来迭代显示照片。让后我们定义一些属性来响应用户对卡片的操作。
###Card视图对应的controller
我们需要CardViewCtrl使侧边滑出菜单失效,因为它会与Tinder卡片功能冲突 。这里我们通过$ionicSidemenuDelegate来设置当内容进入视图时拖拽不可用。当离开视图时,我们恢复可用,使别的视图下可以打开侧边菜单。
|
这里cardTransitionedLeft和cardTransitionRight 方法基本上一样的,除了,左滑进代表不喜欢,右滑是代表喜欢。两者都要判断是否已经登陆。如何用户喜欢当前的卡片但又没有登陆时,会要求用户登陆。一旦登陆成功,这个卡片就会被收藏。这是我们安全认证方案的结果。你可以通过第六章节的 验证 来了解更多的信息。
当一个卡片一旦过渡完并且被销毁时就会调用cardDestroyed方法。我们这里只是将卡片从照片数组中删除。
##List视图选项
Trendicity的列表选项是为了展示ionic核心的列表功能而开发的。比较受欢迎的组件为:拉取刷新,button bars action sheets,视图中的手势。这一部分我们将解析开发列表的过程,和上述的组件。
###涉及文件
列表视图功能涉及的文件:www/templates/tab-list.html,www/js/controllers/list.js和www/js/directives/on-dbl-top.js。路由在www/js/app.js中定义的:
.state('app.home.list',{ |
###模板布局
列表视图模板可以被切分成三部分:刷新,帖子列表,和包含用户可操作铵钮的铵钮条。
###刷新帖子列表
Ionic提供了非常有用的指令,名字为ion-refresher。在使用这个组件时,将标签放到你的视图上,并添加在视图控制器中添加一个处理用户交互的方法,一旦用户向下拉取内容或者触发刷新机制。

为了保存简单易用,我们选择一个刷新铵钮(ion-arrow-down-c)来代替默认的图标,同时设置下拉时提示的文字。
<ion-refresher pulling-icon="ion-ios-arrow-up" spinner="none" pulling-text="Pull to refresh..." on-refresh="doRefresh()"></ion-refresher> |
注意:这个命令允许你通过下面属性来覆盖它默认的配置:
- on-refresh:一旦用户下拉放开后触发刷新机制。
- on-pulling:一旦用户开始下拉时调用。
- pulling-icon:当用户下拉时显示的图标。
- pulling-text:当用户下拉时显示的文本。
- refreshing-icon:当刷新机制一旦触发,这个图标就会显示。
- refreshing-text:一旦数据刷新后,显示的文本。
- disable-pulling-rotation:一旦on-refresh调用开始调用,停止旋转图标。
ionrefresher组件值得注意的提升就是,添加了一个定时器,当很快获取到数据时,刷新显示数据也要耗时最少要400ms。这种情况超时创造一个平滑过渡的假像,使用户感觉到数据是刷新了。
我们回到Trendicity,refresher设置当用户希望获取新的帖子时,触发控制器的doRefresh方法。下面就是刷新时调用的方法:
// Refresh feed posts |
就像前面章节解释的那样,我们使用HomeCtrl的getPosts方式
本章节,我们将会学到运行一个Inoic项目需要哪些技能。你将会安装基础的构建模块,学习如何使用Ionic命令行工具(cli)初始化一个项目,学习如何添加不同的平台和插件及如何在本地浏览器,仿真器和真实的设备上进行测试。 |
安装完后,你可以打一个命令行,输入下面命令进行测试:
$ node |
它会打开一个控制台。它就像是浏览器中的javascript控制台一样。你可以在这个控制台中编写合法的javascript代码。如:
> console.info('Hello World'); |
按两次CTRL+C就可以退出Node.js控制台
##安装Git
NPM是Node.js的依赖管理,bower是browser的依赖管理。由于ionic是基于html5的移动混合应用开发工具和服务套件。bower只是安装和依赖管理。有一些bower模块需要Git,因此在开始之前你必须要先安装Git.
可以在 git-scm.com/downloads下载各个平台的Git安装程序。
一旦你安装了Git,打开终端,输入:
$ git version |
##安装Installing Ionic
现在你已经安装了Node.js和Git,安装Ionic就变的非常容易了。打开终端,输入:
$ npm install -g cordova ionic |
这行命令就是让NPM安装cordova和ionic包,和他们所依赖的模块。加上-g这个选项,意味着NPM在全局中安装它他们,因此你就可以在所有项目中使用它们。
一旦NPM选择完,就会输出一个安装汇总。下面你可以验证安装。
##Cordova
下面花一些时间去讲解Cordova是什么,是非常值得的,因为他是Ionic为什么如此强大的最重要的原因。
Cordova 是一个社区驱动的开源项目,它是HTML和手机原生功能之间的桥梁。它使开发者能够构建一个html应用,这个应用可以直接使用手机原生的功能,如何像机,地理位置,设备的方向等。另外,Cordova目的是创建一些跨平台的接口,使你创建html应用而不用关心是iphone应用还是在android应用。
你可以在这里了解决更多关于Cordova的知识。
##Ionic命令行 (CLI)
为了使你能更方便的使用Ionic,Ionic提供了命令行接口。
- 创建一个新的工程
- 添加平台
- 添加插件
- 编译和在仿真器中运行你的工程
- 在设备上运行你的
- 打包应用和发布
##创建一个新的工程
让我们创建一个新的应用。打开终端,定位到你想把本书涉及到的代码存放的位置。在这目录下面输入下面的创建应用的命令。
$ ionic start trendicity tabs |
这个ionic start命令可以让你指定一个模版用来初始化Ionic应用的结构。上面这个例子,你指定了tabs模版。开箱即用的,Ionic支持空白模版(不指定模版,默认就是空白的),tabs和 sidemenu。另外,如何你想提供一个自定义模版,你可以指定一个CodePen URL.
一旦上面那个命令执行完,你就已经配置好了一个Ionic工程,就会看到下面信息:
Your Ionic project is read to go ! Some quick tips: |
同时你会看到一些快捷提示。你可以随时查看这些提示,通过下面这个命令:
ionic --help |
这个将会输出一个Ionic命令行支持的指今列表
看一下刚才那个命令为你创建了哪些东西
$ cd trendicity |
bower.json:管理你的Bower依赖
gulpfile.js:Gulp是一个构建工具。更多的信息可参在这里找到。这个文件管理构建的流程。
ionic.project:ionic工程配置文件。
plugins/:Ionic插件文件放在此目录下。稍后你会了解更多关于这插件的信息。
www/:你的应用文件放在此目录下。
config.xml:Cordova的配置文件。
hooks/:Cordova的hooks 这里面有一个说明文件,我可以根据此文件来创建一系列的目录,这些目录里面可以创建一些脚本,这些脚本分别在ionic运行的不同时期进行执行。
package.json :管理Node.js依赖的文件
scss/: SASS 文件。
好,现在,我们把重点放在 www 目录。
localhost:trendicity Aaron$ cd www |
css/:你的应用的CSS文件img/:你的应用中用到的图片index.html:你的应用的入口js/:你的javascript代码lib/:第三方库和Ionic库templates/:你的应用的HTML模版
在js引以为文件夹中会发现有三个文件:
localhost:js Aaron$ ls -F |
若没有发现services.js文件,你可以自己创建一个。
app.js:你的应用的入口,它包括路由信息。controllers.js:包括例子应用的所有的控制器。services.js:应用的可重用的服务。
值得注意的是,这是一个简化的项目结构,随着你的项目的增长,你需要去完善它。
##在浏览器上部署
刚开始时,与通过仿真器测试相比,在浏览器中进行测试是最快的方式。它是可以在浏览器中进行测试的,因为Ionic是一个基于html5的平台。另外,Ionic现有的内置功能让其变得更加简单。在你的命令行中的工程目录下,输入以下命令。
$ ionic serve |
上面的命令执行完成后,将会打开一个浏览器窗口并且访问你的应用。恭喜你,你的应用已经成功运行!
如何浏览器窗口没有自动打开, Ionic通知你在浏览器中打开这个应用。你上面你会看到
http://192.168.1.7:35729 |
这个命令将会监视你的工程文件的变化,因此当你改变工程中的文件时,视图也会自动刷新。你可以通过修改工程的一个文件并注意着浏览器的重新加载来进行测试。打开./www/templates/tab-dash.html 文件并且修改:
<h1>Dash</Dash>
修改为:
<h1>Trendicity</h1>
保存后,浏览器会立即发生刷新,你就会看到刚才修改文件后的变化。
##代理
当你的应用需要访问不允许跨域访问的资源的APIs时,在浏览器测试时,你将会遇到问题。幸运的是Ionic团队已经 通过代理请求的方式来解决上面的问题。
在你应用的根目录下打开ionic.project。
cat ionic.project |
添加代理数据到你的文件中:
cat ionic.project |
在这个例子中的path是你本地想被代理的路径,这个proxyUrl是真正的你想被请求的API.在你的应用中,你现在可以请求http://localhost:8100/proxied/resources其实是访问的https://api.somesite.com/resources.
注意,代理的配置仅在浏览器中进行测试时需要用到。在设备上和仿真器中不需要用这个配置文件。
##添加平台
当你发布之前,或者在你构建一个应用时,你需要决定你想将此应用部署到哪些平台上。然后告诉给Ionic,通过CLI,安装构建成这此平台的应用时所必须的先决条件。让我们来添加IOS平台。
$ ionic platform ios |
它将会安装一些必须的依赖并准备将你的工程构建成IOS平台的应用。注意,如何你不是在Apple电脑上,你是不能够添加iOS平台的。
或,你可以添加Android平台:
$ ionic platform android |
Android平台与iOS相比,需要安装一些额外的东西 当你都是在Apple电脑上执行上面的命令时。在稍后的章节中你会了解到更多关于Android安装的信息。
如何你决定选择在Android平台上进行测试,建议你不要使用Android默认的仿真器。因为它太慢了。你可以安装使用Geny-mogion仿真器,它比默认访真器要快一些。你可以在这里了解更多的内容。
##构建应用
用Ionic构建应用是容易的。构建一个iOS平台的应用,通过如下命令:
$ ionic build ios |
一旦构建成功,你会看到输出下面信息:
** BUILD SUCCEEDED |
##编译和在仿真器中运行你的工程
Ionic支持直接通过CLI加载设备仿真器。加载你的编译文件到iOS仿真器(确保你已经安装了ios-sim)。
ionic emulate ios |
如何你之前没有进行编译,Ionic会创建iOS平台的编译文件。执行这个命令之后,iOS 仿真器将会加载,并且你的应用将会在其中加载。
像是在浏览器中测试一样,你可以修改你的应用文件时,让仿真器中的应用自动刷新。执行下面的命令,等待仿真器加载你的应用,然后修改应用的文件进行观察仿真器中应用的变化。
ionic emulate ios -livereload |
第一次修改工程,都会花大量的时间去编译和加载到仿真器。
##在设备上运行
仿真器是非常强大的,但是在发布之前,你仍然想在真实的设备上测试你的应用。
###iOS
在iOS设备上部署,需要有一个iOS开发帐户,在Apple设备上运行XCode。iOS开发者账户是收费的。你可以在developer.apple.com/programs/了解更多。
你可以在这里下载Xcode:(developer.apple.com/xcode/downloads/)[https://developer.apple.com/xcode/downloads/]
一旦你正确安装了XCode和拥有你自己的开发者账户,在XCode中打开你工程的/platform/ios文件夹,然后进行测试。
###Android
到目前为止,我们主要集中在构建、模拟和运行iOS应用程序。原因是,如果你在Apple电脑上进行开发,启动和运行都是非常容易的,但是它避免了使用Ionic进遇到的最大的一件事情。你编写一次应用,可以编译成两个平台的版本。让我们花一点时间看一下在Android平台上启动和运行时的一些选项。
###Android SDK安装
第一件事就是下载和安装Android SDK.可以在这里下载:developer.android.com/sdk/。可以在这里找到安装步骤:developer.android.com/sdk/installing/。
###Ionic box
很多人发现安装Android SDK是比较困难的过程。由于这个原因,Ionic小组已经创建了一个Vagrant box来帮助你简化这个过程。如何你对Vagrant不是很熟悉的话,它是一个创建虚拟机的平台,主要是创建开发环境。你可以在这里了解更多:www.vagrantup.com。你可以使用不同的虚拟机运行器,但是最常用的是VirtualBox。
为了使用Vagrant box,你首先安装VirtualBox,或者别的被Vagrant支付的虚拟机运行器。VirtualBox是免费的,你可以在这里进行下载:www.virtualbox.org/wiki/Downloads。一旦安装好了VirtualBox,下载并安装Vagrant:www.vagrantup.com/downloads.html。
一旦你安装好了VirtualBox和Vagrant,进入到你的工程目录下面,克隆Ionic box资源,并且启动它。
cd .. |
你第一次执行时,可能要花费几分钟,因为Vagrant需要下载一个虚拟机镜像文件。在你在Ionic box上编译你的应用前,你需要将你的项目代码目录与虚拟机共享。在你的编译器中打开ionic-box/Vagrantfile。找到下面这行:
修改为:
config.vm.synced_folder "../trendicity", "/home/vagrant/trendicity" |
保存这个文件并重新加载你的Vagrant实例:
现在让我们为vagrant实例添加SSH,并针对Android进行构建。
$ vagrant ssh |
现在将你的Android设备通过USB连接到你的电脑。你可以通过下面的命令确认你的设备已经连接上。
vagrant@ionic-android:~/trendicity$ sudo /home/vagrant/android-sdk-linux/platform-tools/adb devices |
确认你的设备已经连接上,然后通过下面的命令在你设备上启动应用:
vagrant@ionic-android:~/trendicity$ ionic run android |
当你看到下面的信息,就证明上面的命令执行成功了:
Installing app on device ... |
恭喜!你已经成功在android设备上运行了你的应用。
上面看上去在你的设备上运行应用程序是很多麻烦,同时它证明了android sdk安装是多么的困难,以及ionic团队如何使它些困难变的简单易用。
##添加插件
Ionic和Cordova是非常强大的工具,但是为了提高性能和最小化你的就应用,你可能不希望默认安装所有东西。你可能添加别的功能通过添加插件的方式。让我们给将要使用地理定位功能的应用添加地理位置插件。
在你的项目根目录,输入以下命令。注意,你可以在本地命令行中执行下面命令,也可以在ionic box 的命令行中输入以下命令:
$ ionic plugin add org.apache.cordova.geolocation |
Ionic将会安装一些必须的组件,使你的应用程序可以使用地理定位功能。稍后,当你深入到本书例子 Trendicity应用 的细节时,你会看到如何使用这个地理定位插件。
你也要以自动在这里plugins.cordova.io/了解一下别的插件,以备将来更好的使用到自己的项目中。
##最佳源代码控制实践
因为Ionic和Cordova安装的文件对不同的平台是不一样的,这些文件是没有必要加入版本控制的。让我们看一下,哪些东西要存放到我们的版本控制中,还有哪些不用存放。
###Git和模版化应用
如何你使用Git(本书的作者们强烈推荐使用Git),和如何通过Ionic命令行创建你的应用,你可能注意到它创建了一个.gitignore文件,它里面包含一些你不需要版本控制的文件引用。你可以选择跳过本章剩余的部分而直接查看这个文件.gitignore,下面是它的内容:
$ cat .gitignore |
###根目录下面的文件
根目录下所有的文件,你就都应该加入版本控制。它们包含了项目的配置信息,没有它们,你的项目将无法正确编译。
###包含的目录./hooks,./scss,和最重要的./www 都应该加入到你的版本控制。
###不需要包含的目录
./node_modules,./platforms, 和 ./plugins 都不需要加入版本控制。他们包含了许多二进制文件和一些额外的编译时生成的文件,这些文件在部署时都会重新生成。也都会在你在新的机器上检出代码时自动生成。
##总结
你现在准备开始创建你的应用。你拥有了创建一个应用需要的所有工具:你可以通过浏览器或者仿真器进行测试,你可以通过添加插件的方式去访问一些高级的功能,并可以让你的应用在真实的设备上进行运行。